Work in Progress
This page is work in progress… I may add or change parts of this page in the future. Reply to the Bluesky thread to leave suggestions!
Intro
This guide is not intended to cover the very basics of uploading a VRChat avatar, there’s a lot of resources out there for this already. It assumes you’re already familiar with getting a base model into Unity, making changes to it, and uploading it to VRChat.
This guide mainly covers optimisation in Unity directly using non-destructive tools. Although with some avatars, this may not be enough. In those cases, you may need to edit the model directly in Blender, which is not covered in this guide.
This guide also only covers methods I have personally tried. Whilst there’s a lot of other tools out there, I will only suggest them here if I actually use them for some of my avatars (unless stated otherwise).
A note on performance ratings.
VRChat’s performance rating system is not perfect, but it does decide how optimised your avatar appears to be and decides who gets to see it. There’s a lot you can do to actually make your avatar perform better for others beyond just improving your rating. Things like complex animator controllers and heavy shaders will hurt your performance but they’re not included in the rating, so it’s possible to have an avatar that’s technically very unoptimised which still maintains a good rating.
That being said, this guide mainly aims to tackle the basics to ensuring your avatar isn’t very poor so others in public instances and events can actually see it. More in-depth optimisation techniques are beyond the scope of this guide.
Non-Destructive Workflow
Most things I do in my workflow are non-destructive. You can refer to a list of Unity tools for optimisation below, these are generally non-destructive.
Optimisation Tools
Link to original
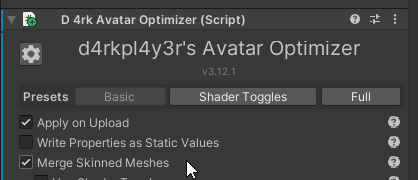
- ⭐d4rkAvatarOptimizer - Non-destructive automatic avatar optimisation — essential when working with purchased base models. Merges skinned meshes, removes unused stuff.
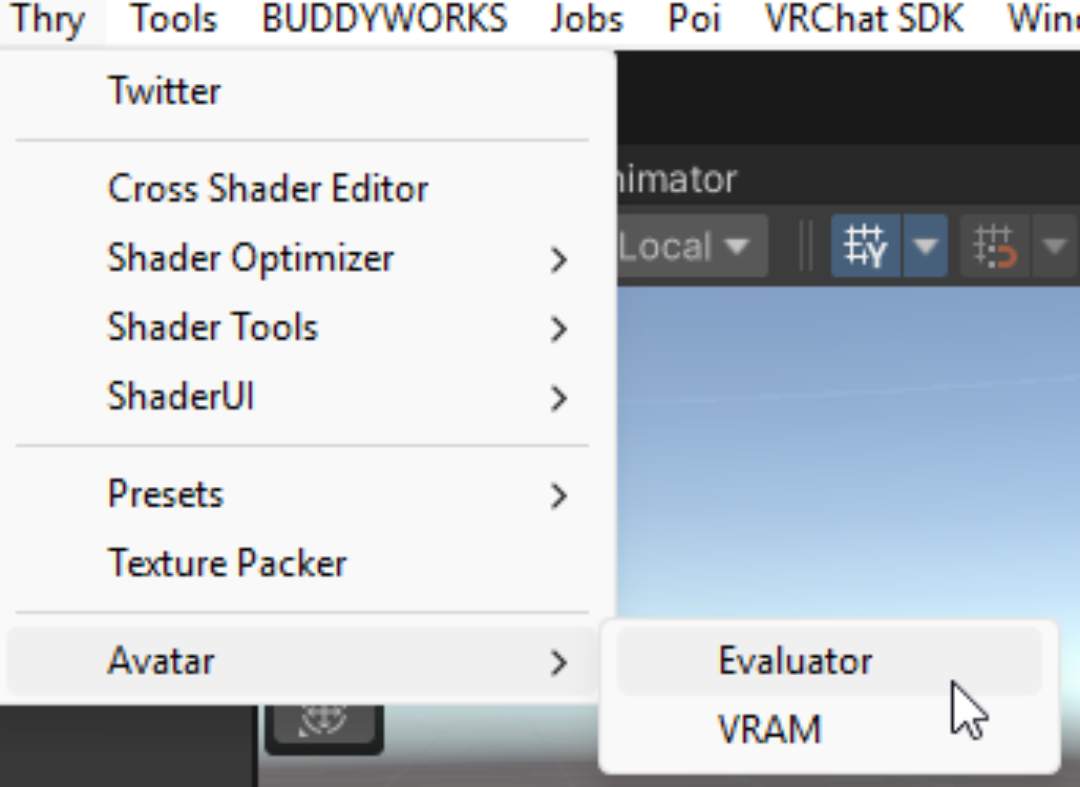
- Thry’s Avatar Performance Tools - Great tool for finding which textures are eating up your texture memory.
- Prefabulous - Specifically the Delete Polygons component. Can non-destructively delete all polygons affected by a blendshape. Useful on “hide” blendshapes to fully delete them when optimising an avatar.
- Anatawa12’s Avatar Optimizer - Also includes a remove mesh by blendshape option, similar to Prefabulous, along with other remove mesh options. I specifically like the Merge Physbone component, useful for avatars that have like 20 separate hair physbones.
- VRCQuestTools - Easily optimises your avatar to be quest-compatible.
- Meshia Mesh Simplification - Free asset for reducing the mesh quality to stay within polycount limits.
General Tips
One outfit per upload.
Whilst it’s cool to be able to switch / mix match outfits on the fly, nothing’s stopping you from just uploading multiple versions of your avatar. Toggling parts of your outfit on and off is usually fine (although this can limit how much you can optimise), but you don’t need to put everything on a single upload. You can keep all outfit variations of your avatar in the same project, even the same scene, so it’s better to manage outfits through separate uploads.
Common Performance Issues
Too many skinned meshes
Avatars are often made up of several different objects, or meshes. Having many of these meshes is bad for performance. Skinned meshes are heavier on performance than regular meshes as they have additional data, like weight painting and blendshapes. A lot of avatars are split into several meshes to make it easier to customise parts of the avatar or switch outfits, but it’s better for your final upload to combine as many of these meshes as possible.
Tools:
Fix:
Simply adding d4rk’s avatar optimizer to your avatar with its default settings is usually enough to resolve this. It has an option to combine skinned meshes into a single mesh. Keep in mind that you cannot usually combine skinned meshes which can be turned on/off by toggles, although you can try the “Use Shader Toggles” option if the regular merging is not enough.
You can also manually delete any unused objects from your avatar.
Texture memory / VRAM usage too high
Many avatars have default texture settings set way too high. This is even more of an issue with some prefabs that may use 4k textures for tiny details. A good general rule I like to follow is no higher than 4K resolution for anything atlassed (e.g. when a whole avatar or entire outfit uses a single main texture). No higher than 2K resolution for non-atlassed textures, like a hoodie or hair.
But you can change this on a case-by-case basis. Pick the smallest resolution that still looks good. And if your texture memory is still too high, consider lowering further even if your avatar looks a little bit pixelated.
Tools:
Fix 1: Lowering Texture Resolution
This tool will list all the textures on your avatars and has some one-click fixes to change the compression method which reduces the memory usage.
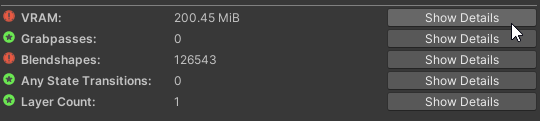
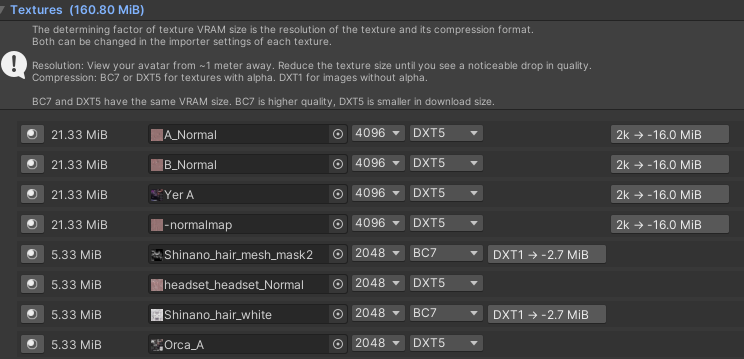
Additionally, you can use it to find the textures taking up the most memory. Generally, 4K textures are unnecessary unless they have some fine detail or are atlassed for a large part of your avatar. Lower the texture size in Unity for all your least important textures first.
The evaluator will also suggest changing the compression type for some of your textures (DXT1 button in example below), you can generally do this for all suggested textures without a noticeable visual impact.
Fix 2: Removing unused / unimportant textures
This can be a bit more extreme so you may only really need to do this if the first fix isn’t enough.
You can go over your material and remove some less important texture. For instance, the normal map will add some visual depth to your material but in extreme cases, you may consider removing it if it doesn’t add much to your avatar.
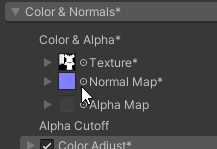
Additionally, some shaders may reuse the same type of texture in multiple places. If you made a custom texture and assigned it as your base colour, ensure that you also replace all other instances of the original texture in the material. Sometimes, you may accidentally leave a large texture in your shader that isn’t contributing to anything.
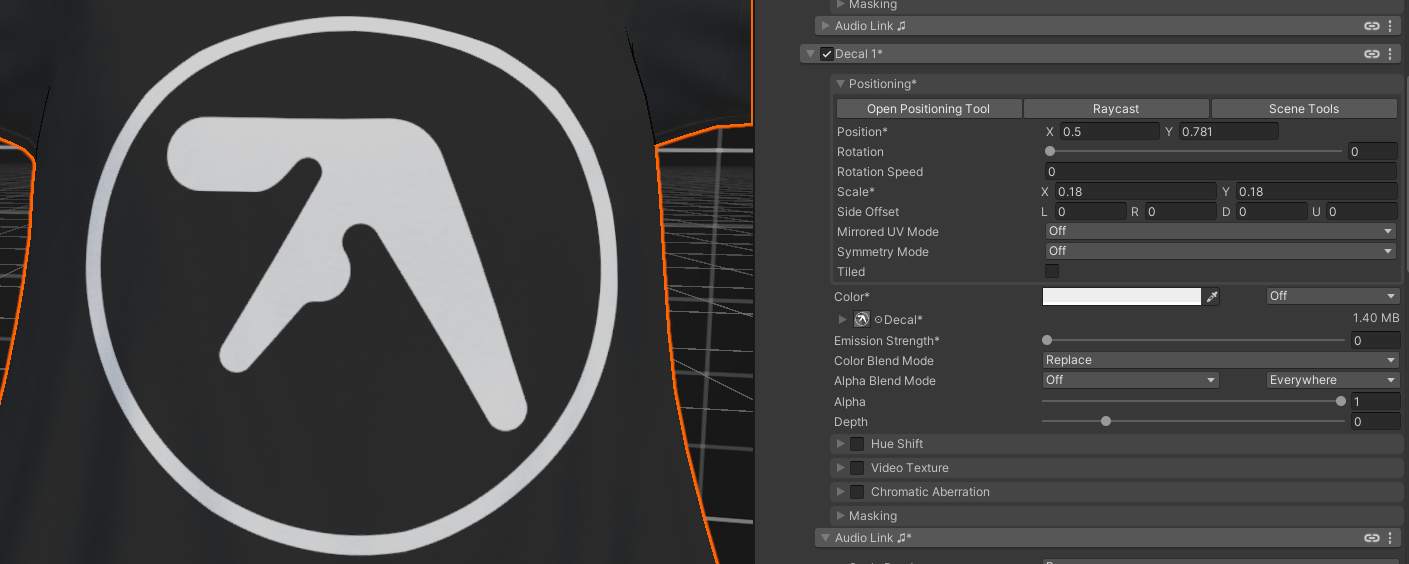
Tip: Use Decals
If you want to reduce the texture resolution for something like an outfit whilst keeping the graphic on it crisp, you can use decals if your shader supports it. This way, you can reduce the quality of the overall texture whilst adding a small extra texture which only contains the high-quality logo or image.
You can also use this to apply cool effects, like making it spin with Audiolink or hue shift. The main downside is that the image will not be visible with fallback shaders or on Quest.
Example of adding a logo to a T-shirt using a Poiyomi decal.
Tip: Use Repeating Detail Textures
Some textures, especially for clothing, may feature a repeating pattern. You can use a repeating detail texture depending on your shader.
Too many polygons
This is a classic issue to run into. Whether you have high poly unoptimised outfits or your base model itself is unoptimised to begin with.
There’s two main ways to fix it:
- Removing hidden / unnecessary geometry
- Decimating / simplifying your mesh.
Tools:
- Anatawa12’s Avatar Optimizer - Specifically the remove by box and remove by blendshape options.
- 💸Polytool - I have not tested this one myself, but it is supposed to simplify / decimate the mesh.
- Meshia Mesh Simplification - Free asset for reducing the mesh quality to stay within polycount limits.
Fix 1: Removing hidden parts of the mesh
Using AAO Remove Mesh By BlendShape from Anatawa12’s Avatar Optimizer
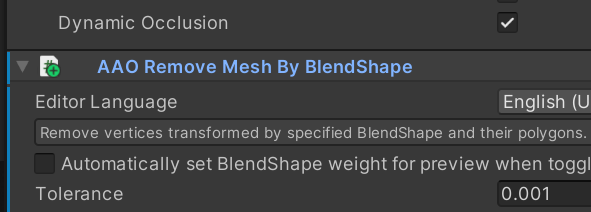
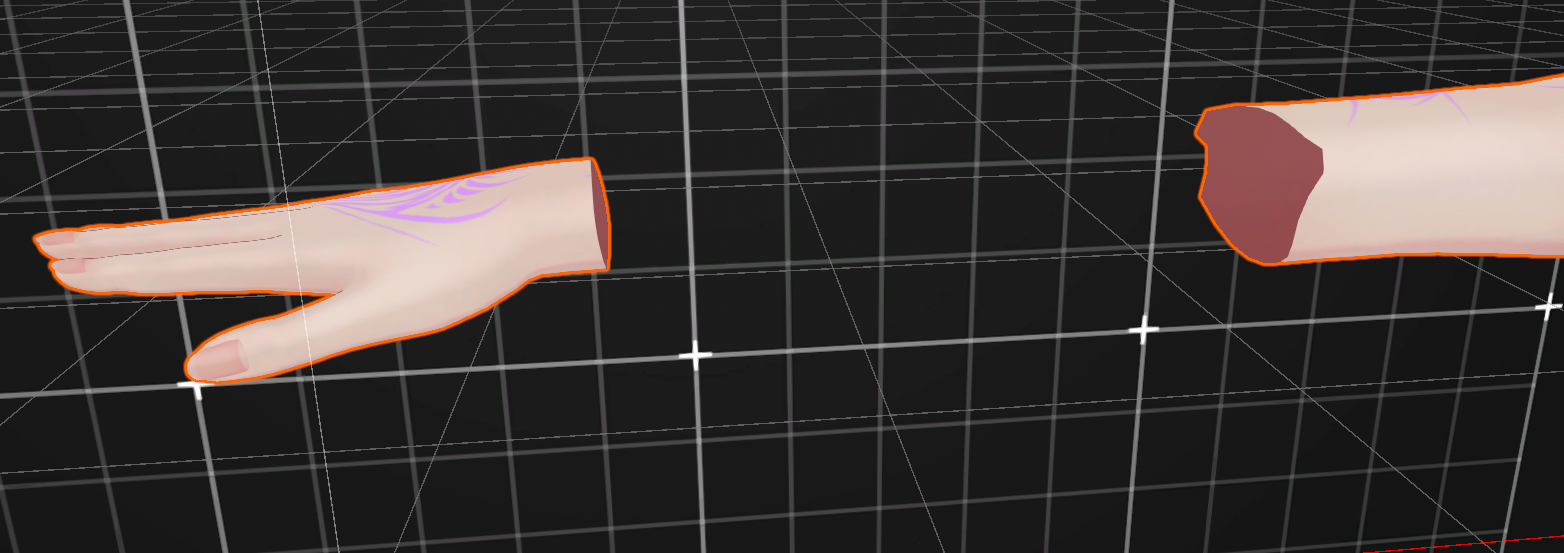
Many base models have blendshapes for hiding parts of the body. With this tool, you can completely delete parts that are hidden by clothing, which reduces your polycount.

Example: Removing the arm that would normally be hidden under some clothing
![]()
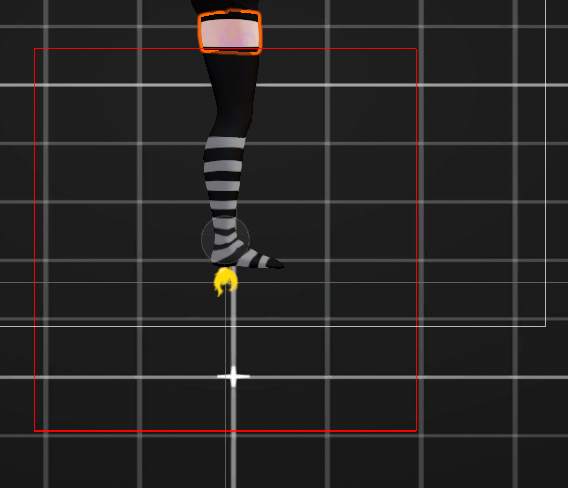
You can also use AAO Remove Mesh By Box to hide everything inside a box, if blendshapes aren’t quite set up the way you need them
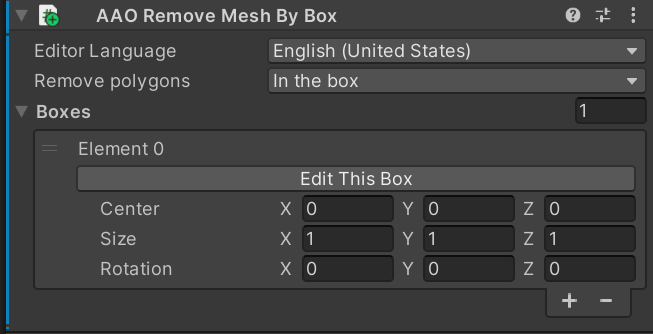
Hiding the legs underneath the socks using Remove Mesh By Box
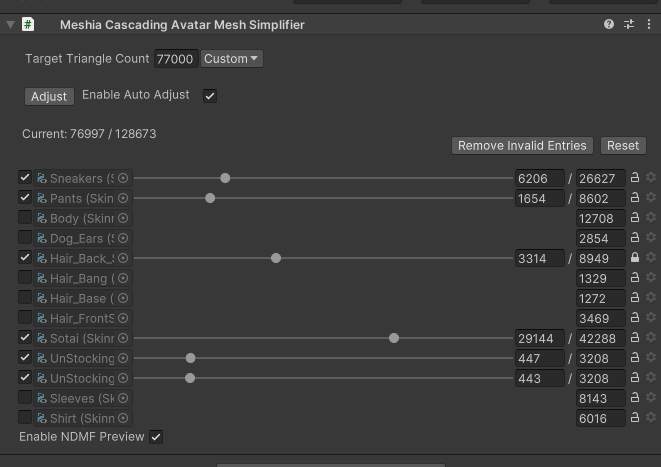
Fix 2: Reduce mesh quality
Once you have removed the hidden parts of the mesh, you can go ahead and reduce the quality of anything that remains to get you under the limit.
For this, I use Meshia as it’s free and works pretty well. Just add the Meshia object to your avatar and adjust the sliders until it looks good. In this example, I set my polygon target to 77,000 as it doesn’t account for the tris removed from the previous step, so the final result will actually be below 70,000.
You can also configure it to not touch important meshes, like the face.

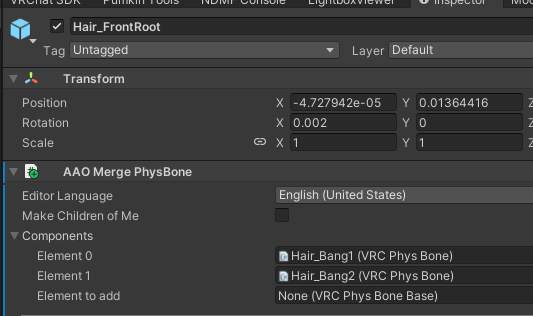
Too many physbone components
In many cases, physbones can be merged into one root physbone or removed entirely.
You can use Anatawa12’s Avatar Optimizer’s Merge Physbone component to create a root physbone. This works well with things like hair on some avatars.
Other Info / Reference
Limits
As of 2026-04-13
Refer to the official limits docs here.
PC Limits
| Avatar Quality | Excellent | Good | Medium | Poor |
|---|---|---|---|---|
| Triangles | 32,000 | 70,000 | 70,000 | 70,000 |
| Bounds Size1 | 2.5m x 2.5m x 2.5m | 4m x 4m x 4m | 5m x 6m x 5m | 5m x 6m x 5m |
| Texture Memory | 40 MB | 75 MB | 110 MB | 150 MB |
| Skinned Meshes | 1 | 2 | 8 | 16 |
| Basic Meshes | 4 | 8 | 16 | 24 |
| Material Slots | 4 | 8 | 16 | 32 |
| PhysBones Components | 4 | 8 | 16 | 32 |
| PhysBones Affected Transforms | 16 | 64 | 128 | 256 |
| PhysBones Colliders | 4 | 8 | 16 | 32 |
| PhysBones Collision Check Count | 32 | 128 | 256 | 512 |
| Contacts | 8 | 16 | 24 | 32 |
| Constraint Count | 100 | 250 | 300 | 350 |
| Constraint Depth | 20 | 50 | 80 | 100 |
| Animators | 1 | 4 | 16 | 32 |
| Bones | 75 | 150 | 256 | 400 |
| Lights | 0 | 0 | 0 | 1 |
| Particle Systems | 0 | 4 | 8 | 16 |
| Total Particles Active | 0 | 300 | 1000 | 2500 |
| Mesh Particle Active Polys | 0 | 1000 | 2000 | 5000 |
| Particle Trails Enabled | False | False | True | True |
| Particle Collision Enabled | False | False | True | True |
| Trail Renderers | 1 | 2 | 4 | 8 |
| Line Renderers | 1 | 2 | 4 | 8 |
| Cloths | 0 | 1 | 1 | 1 |
| Total Cloth Vertices | 0 | 50 | 100 | 200 |
| Physics Colliders | 0 | 1 | 8 | 8 |
| Physics Rigidbodies | 0 | 1 | 8 | 8 |
| Audio Sources | 1 | 4 | 8 | 8 |
Mobile Limits
| Avatar Quality | Excellent | Good | Medium | Poor |
|---|---|---|---|---|
| Triangles | 7,500 | 10,000 | 15,000 | 20,000 |
| Bounds Size1 | 2.5m x 2.5m x 2.5m | 4m x 4m x 4m | 5m x 6m x 5m | 5m x 6m x 5m |
| Texture Memory | 10 MB | 18 MB | 25 MB | 40 MB |
| Skinned Meshes | 1 | 1 | 2 | 2 |
| Basic Meshes | 1 | 1 | 2 | 2 |
| Material Slots | 1 | 1 | 2 | 4 |
| Animators | 1 | 1 | 1 | 2 |
| Bones | 75 | 90 | 150 | 150 |
| PhysBones Components2 | 0 | 4 | 6 | 8 |
| PhysBones Affected Transforms2 | 0 | 16 | 32 | 64 |
| PhysBones Colliders2 | 0 | 4 | 8 | 16 |
| PhysBones Collision Check Count2 | 0 | 16 | 32 | 64 |
| Contacts2 | 2 | 4 | 8 | 16 |
| Constraint Count2 | 30 | 60 | 120 | 150 |
| Constraint Depth2 | 5 | 15 | 35 | 50 |
| Particle Systems | 0 | 0 | 0 | 2 |
| Total Particles Active | 0 | 0 | 0 | 200 |
| Mesh Particle Active Polys | 0 | 0 | 0 | 400 |
| Particle Trails Enabled | False | False | False | True |
| Particle Collision Enabled | False | False | False | True |
| Trail Renderers | 0 | 0 | 0 | 1 |
| Line Renderers | 0 | 0 | 0 | 1 |
Suggestions
Reply to the linked Bluesky thread to leave a comment under this page with any additional suggestions!